Back to
Scott's
Crystal Radios
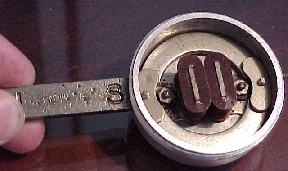
Next, touch that pole (South in this illustration) of the magnet
to
the corresponding (North) outside edge of the housing where the
ends of
the magnet are screwed down and tap lightly to set the magnetism.
I tap
the magnet on and off a couple times as the tapping "sets" the
magnetism
a bit. Repeat with the North end on the other side of the
headphone.
*If you want to get a little more strength, you can remove the
flat
magnets from the housing and touch tap the booster magnet right on
to
the
end of the headphone magnet and the direct contact will give a
little
more
strength.
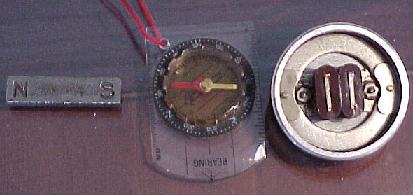
I use a big strong Neodymium Iron Boron rare earth magnet (not the
ordinary bar magnet in the illustration) that gives a good result
just
by magnetizing the headphone magnet right through the housing. A
smaller
booster magnet might not give as good a result this way and may
need to
be applied directly to the disassembled headphone magnet pieces.
NOTE: The magnet pictured here is not the strong rare
earth
magnet
described below. It is just a cheapie bar magnet with the N and S
marked
on it for illustrative purposes. The rare earth magnets are
smaller.
Repeat with the opposite pole of the magnet at the other edge of
the
housing.
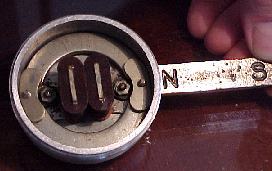
Now, try the diaphragm and see how the strength of the magnet is.
Repeat
if necessary. If you want to get a little more strength, you can
remove
the flat magnets from the housing and touch tap the booster magnet
right
on to the end of the headphone magnet and the direct contact will
give
a little more strength.
A procedure has been described using electromagnets that are
energized
by huge capacitors that "flash" a brief but strong magnetic field
by
capacitive
discharge through very heavy gauge wire coils around the magnet
pieces.
However, the method I described has worked very well and is quite
satisfactory,
much safer and requires no special equipment except the magnet and
compass.
The key is to have a very strong booster magnet like a rare earth
Neodumium
iron boron magnet.
I got mine from www.wondermagnet.com
but they are available at hardware stores for making magnetic
latches,
etc. They can also be salvaged from old computer drives.
Removing Stuck Earcaps
If earcaps are stuck tightly, try blowing a hair dryer on the cap
for
a couple of minutes and then unscrewing it. Use a rag or towel to
protect
your hand from the heat. I have had great success with this. If
still
stuck,
I have heard of a tool called a Boa Constrictor by Harbor Freight
that
has a rubber strap and a lever to grasp the unit for some extra
leverage.
Sears also makes a strap wrench in their Craftsman line of tools.
Replacing pin tips
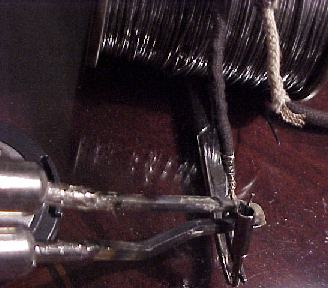
The ends of the cord are exposed to constant bending back
and
forth and the pin tips frequently break off. To reset the pin tip
it
must
first be emptied of the old wire soldered into it. It is best to
hold
it
in a clamp like a hemostat clamp, that can be obtained at a
fishing
store,
craft or tool shop, or a clothespin. Otherwise you can drill a
little
hole
in a piece of wood for the narrow tip to fit into and leave the
wider
part
of the tip sticking up. Heat up the tip plug with a good hot
soldering
iron and pull out the debris. A little 30 watt iron won’t do the
job.
Use
a big 100 watt or bigger soldering gun that gets nice and hot or
you
will
wait forever for the tip to reach solder melting point. While the
solder
is still molten turn it over and bang out all the remaining debris
into
the trash can watching out for the hot solder. Trim the insulation
about
1/8 back off the tip of the wire, so the copper conducting
strands
are protruding like in the white wire above.
Then use a fine single strand of about 28
gauge bare or tinned wire and start wrapping the tip of the wire,
start
wrapping about 1/8 from the end of the insulation and wrap tightly
all
the way to the tip of the conducting strands like in the black
wire
above.
Cut off excess wrapping wire. The cord is then prepared to attach
to
the
tip. Holding the pin tip in the clamp, heat it up and melt some
solder
inside. Then push the wrapped end of the cord into the tip and try
to
get
all of the wrapped part into the tip so you have a neat joint. Let
it
cool
and test it with a gentle tug to make sure it holds firmly.
Inside Soundpowered Headsets
Take this hot link to a related page by a colleague who
specialized
in sound powered equipment.
http://www.boydhouse.com/radio/insideelements.html
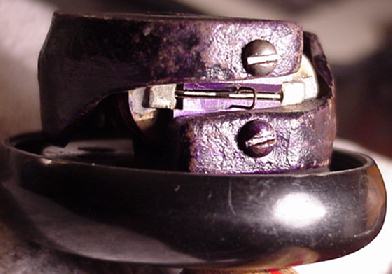
Inside Baldwins
Baldwin headphones are very difficult to repair
since they have a moving armature that pivots at the center and
has a
very
narrow slot that it fits in between the magnet and coil cores. The
diaphragms
also were subject to damage. A small crack in the mica may be
inconsequential
or could be sealed up with some super glue or Duco household
cement. If
the mica is completely shattered the sound will be poor and the
diaphragm
should be replaced if possible.
In the picture you can see the end of the thin
armature
plate that has a little bent over pin to hold it in place. There
is a
tiny
clearance on each side of the armature so it doesn't touch the
magnet
poles
or that would stop the free vibration. The space should also be
free of
any debris that would dampen out the movement.
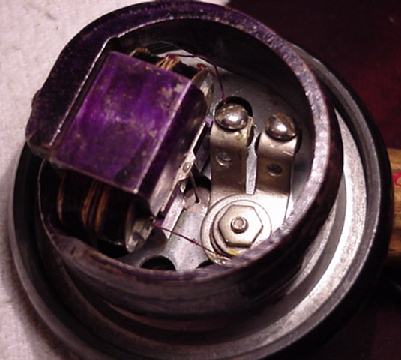
Inside, you can see the attachment of the
armature
to a pin and from there to the center of the diaphragm. The
connection
of the pin to the diaphragm is difficult to detach and replace so
that
it works properly. The trick is to get the armature positioned
exactly
in the middle of the air gap with the diaphragm pulling one way a
little
and the positioner pin pulling the other way, without too much
tension
on either.
Military sound powered headphones work on a
similar
principle, but most have the armature secured a one end and the
pin to
the diaphragm is at the free end. If you are lucky, the pjin is
threaded
and there are tiny nuts that hold the diaphragm in position. To
adjust
the position of the reed, you screw the little nuts up or down the
shaft
to get the reed in the right place. This takes some fine tools and
I
use
some surgical hemostats to reach in there and turn the nuts.
3-D Print Headphone Earcaps: A reader has
developed a 3-D printing process to reproduce earphone caps for
Brandes Superior headphones. Here are the links:
Video showing the process: https://youtu.be/-7h8EQaEMt0
Files for the 3-D printing: https://www.thingiverse.com/thing:3900510
YouTube Channel for the
author: https://www.youtube.com/channel/UCtBGrxdGsbbyz9oZk8mKJbA/videos
Part Sources:
Phoneco, Inc. 19813 East Mill Road, PO Box 70, Galesville,
WI,
54630 phone 608 582-4124 (has vintage old stock brown
cloth
cord, brass binding posts, and pin tips)
Play Things of Past, click or phone 216 251-3714, $30 minimum order. Now with a website.
